In my previous blog, I wrote about why I built Travelogue and the overall approach I took to build it. In this post, I’ll dive deeper into the technical decisions behind the project and share how I used AI as both a sounding board and a collaborator throughout the journey. To be clear, I didn’t write the code myself. AI generated the code, and my role was to iterate on it until it matched the product I envisioned for my own use.
Travelogue is a web application designed for travelers who want to document their journeys digitally in an organized way. It serves two primary purposes:
- Create trips and plan their itineraries.
- Capture travel experiences alongside those itineraries
The current version includes the following features:
- Create one or more trips
- Build an itinerary for each trip
- Write journal entries at both the trip and itinerary levels.
- Upload photos to accompany journal entries
- Track trip expenses (I added this to make the whole travel experience more complete)
- Sign in with Google - no usernames or passwords required.
Each feature supports the basic CRUD operations. With that overview in place, let’s dive into the technical aspects of how the application was built.
Tech Design
Tech stack used
- Front End - Next.js 16, React 19, Typescript, Tailwind CSS
- Backend - Next.js server actions
- Database - SQLite, Prisma ORM, PostgreSQL
- Authentication - NextAuth, Google OAuth
- Hosting - Netlify
- Image storage - Cloudinary
- Dev environment - VSCode, Git, npm, Prisma Studio
- AI - OpenAI GPT 5.5, Go subscription
Architectural Decisions
1. Mobile first UI
This was the first architectural decision I made. I began this project with the aim to use it during travelling. And so, I wanted the app layout to be suited to mobile first and desktop later. This meant that every page on the app was designed assuming:
- phone
- one handed usage
- large buttons
- compact cards
- scrolling ease
2. Mobile app vs Web App
Time was not on my side when I decided to build Travelogue - I had only 10 days to go before I left for Vietnam. I knew that developing a native mobile app - given that I own an iPhone - would take too long. Publishing to the App Store wasn’t a practical option, and while alternatives such as Xcode sideloading or other distribution methods existed, they involved upfront costs. My goal was simply to build a free, personal tool.
Since I only needed a simple, lightweight application without deep iOS or Android integrations, a web application was the most practical choice.
3. Data Modeling
Before I asked AI to generate code, I spent considerable time designing the foundation of the application - the data model. Working alongside developers over the past few years has taught me that a well-designed data model is a critical prerequisite for any coding project.
I shared my PRD with AI and asked it to propose a data model for the application. Its response provided a good starting point, and I iterated on it extensively before arriving at a model that accurately represented how Travelogue would work. The details are explained below.
4. Server actions over RestAPI
Designing the data model gave me a clear picture of what I needed to build. The next step was choosing the right tech stack.
I asked AI to recommend web development frameworks suitable for my application. Since I had no prior experience building web applications, I wanted a stack that was beginner-friendly, well-documented, and easy to learn.
Among the options, I chose Next.js. This meant using Server Actions instead of building a REST API. AI explained that an API-first architecture would add unnecessary complexity for an MVP - more code, separate frontend and backend deployments, and additional infrastructure. Since my goal was to build a simple, functional product, Next.js was the more practical choice.
5. Monolith but modular
Choosing Next.js meant building a monolithic codebase, which I initially wasn’t comfortable with. I wanted to build proper microservices and API layers, similar to how I had seen software developers structure applications.
AI helped me understand that a monolith doesn’t have to mean an unstructured codebase. Instead, I could keep the application as a single codebase while organizing it into clearly separated modules. For example, tripService.ts handles trip-related business logic, itineraryService.ts handles itinerary management, and actions/trip.ts contains the Server Actions related to trips.
The result is a modular monolith: one codebase, but with business logic cleanly separated by responsibility. This makes the application easier to understand, maintain, and debug.
6. ORM over Raw SQL
Another helpful suggestion from AI was to skip raw SQL and use an ORM to interact with the database. My data model wasn’t particularly simple, and retrieving something like an expense could involve multiple JOIN clauses. An ORM acts as a layer between the application and the database, allowing me to define my data models in Prisma and let it translate my requests into SQL behind the scenes.
Prisma also provided a GUI that made it easy to inspect my data and verify that my CRUD operations were working correctly. One of its biggest advantages was how easily I could migrate the database whenever I changed the schema.
For this project, Prisma was a practical choice. Instead of spending time learning SQL and writing additional database code, I could focus more on building the product itself. AI also suggested several other ORMs, but Prisma emerged as the clear winner once I weighed the pros and cons.
7. SQLite and then PostgreSQL
It quickly became clear that I needed a relational database because my application’s core features depended heavily on the relationships between the entities in my data model. I initially chose SQLite because I was developing the application locally. It was lightweight, required no server setup, and allowed me to get started quickly and focus on building the product.
I planned to host the application on Netlify, a platform I was already familiar with. When I mentioned this to AI, it pointed out that SQLite wasn’t suitable for a deployed application because its database is stored as a local file. Each deployment could therefore result in the database being recreated, potentially wiping out my data.
This made PostgreSQL less of a choice and more of a necessity. Unlike SQLite, PostgreSQL stores data separately from the application, so the data persists independently of application deployments.
8. Cloudinary for image storage
Uploading images was a crucial feature for my app, so I had to decide where to store them. I asked AI whether I could store images directly in the database. It said I could, but cautioned that doing so could significantly increase the database size and potentially affect performance.
AI suggested Cloudinary, a cloud-based media storage service. Instead of storing the actual images in my database, Travelogue would upload them to Cloudinary, which would return an image URL. I could then store that URL in the database while keeping the image itself in Cloudinary.
If you look at the process as a whole, I used AI as a sounding board at almost every stage. Whenever I had to choose between different technologies, I asked AI why one option might be preferable to another. Its responses, often structured as simple pros-and-cons comparisons, helped me understand the trade-offs before committing to a technical direction.
I also relied heavily on AI for debugging. Whenever I hit a snag, I would paste the error message into AI and ask it to explain what had gone wrong. Over time, this helped me recognize recurring errors and understand where to look and what to fix when they appeared again.
Data Modeling
The core entity of Travelogue revolves around trip and everything else belongs to a trip.
Every major feature - planning, journalling, travelers and expenses - is scoped to a specific trip.
Main Entities
- User
- Trip
- ItineraryItem
- JournalEntry
- Traveler
- Expense
- ExpenseParticipant
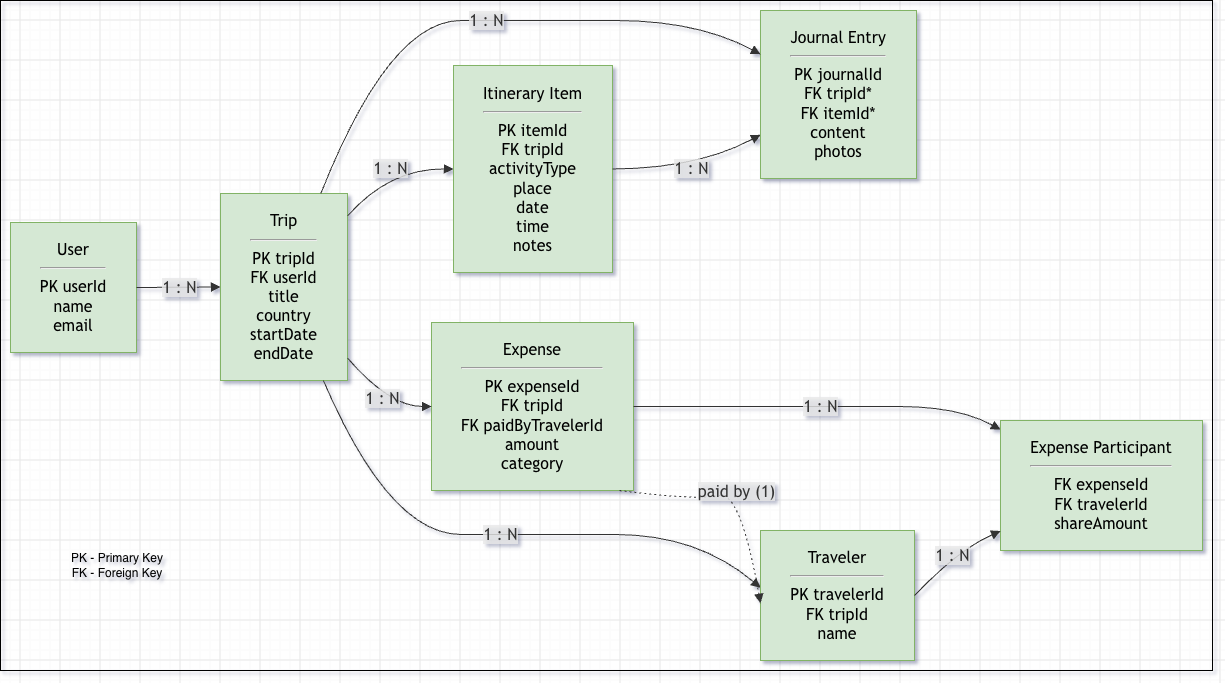
Entity Relationship Diagram - Travelogue
User –> Trip (One-to-many)
Initially, the application only supported a single user. As the project evovled, I decided to move this to a multi-user application, so that others could use it as well. After I integrated Google OAuth, I introduced User as another core entity in the data model.
A user can now create multiple trips, but each trip belongs to exactly one user.
Trip –> ItineraryItem (One-to-many)
Instead of creating an itinerary as a single block, I chose to break it down into a more granular unit - ItineraryItem. I realised that an itinerary involves several activities such as flights, check-ins, exploration, meals etc. Modeling the itinerary at this level of detail would allow users to document every meaningful part of their journey, rather than just the trip as a whole.
Now an ItineraryItem stores:
- activityType - an enum {TRAVEL, CHECK_IN, CHECK_OUT, MEAL, EXPLORE}
- place
- Date
- Time
- Notes
Trip –> JournalEntry and ItineraryItem –> JournalEntry (One-to-many)
As someone who enjoys documenting trips in detail, I wanted to capture everything, from what I ate and where I ate it to the exhibits I saw in a particular museum. To support this, I designed the journaling component so that entries could be associated either with an entire trip or with an individual ItineraryItem. This gives users the flexibility to record broad reflections as well as the finer details of each experience.
A JournalEntry can therefore belong either to a Trip or to an ItineraryItem.
Trip –> Expense (One-to-many)
Adding an expense module was an afterthought. I added it primarily to make the application feel complete, even at an MVP level. I didn’t want to rely on a separate app like Splitwise to track trip expenses, so it made sense to build the functionality directly into Travelogue.
A trip can now have multiple Expense records tied to it. An Expense stores:
- amount
- payer
- category
However, recording expenses alone wasn’t enough - expense settlement naturally followed. At this point, AI suggested introducing another entity - ExpenseParticipant. This simplified settlement calculations by explicitly tracking everyone involved in a particular expense.
So now, Expense –> ExpenseParticipant is a One-to-many relationship.
Trip –> Traveler (One-to-many)
The idea of introducing a Traveler entity came after I designed the expense module. In most cases, an ExpenseParticipant would simply be one of the travelers on the trip. This realization made the concept of a dedicated Traveler entity much more compelling, especially as I started thinking about future features such as trip sharing and collaboration.
Now the ExpenseParticipant entity derives its information from Traveler.